Saturday, September 13, 2014

Funeral flower, calla lily or death lily. Zantedeschia aethiopica. Weed plant or ornamental plant?

Old school ornamental garden plant Zantedeschia aethiopica

Zentedeschia aethiopica is a really classic plant that is found in many gardens in Melbourne Australia. It is one I associate with the 60s because it seems to be in lots of gardens that look like they were planted out in that era. Often when I look in the established gardens of old orange brick houses or Californian bungalows they seem to have a clump of these somewhere. Often they are amongst all the other old style plants that are no longer used in todays planting, things such as the red berried Catoniasta or mirror bush (Coprosma repens). I clearly remember clumps of funeral flowers growing in my Grandparents house so maybe that's also why I think of it as an old school plant. It is native to regions in southern Africa, has a height of potentially 1m and a clump may potentially spread to approximately also 1m. It is well known for its large white flowers consisting of a white spathe surrounding a yellow spadix.

Is the yellow spadix of Zantedeschia aethiopica poisonous? 

The short answer is yes. However according to information I've read on the Kew gardens website the whole plant is poisonous not just the spadix. Eating this plant can cause irritation, swelling of the mouth and acute diarrhoea. Not my idea of a good time.   

Common names for Zantedeschia aethiopica

The other gardeners I speak to today almost exclusively give this plant the rather plain moniker of arum lily. It has many common names, the most popular of which seem to be funeral flower, trumpet lily, calla lily and death lily. Funnily enough my own mother had funeral flowers at her wedding (I'm not sure if she knew of the flowers name).

A plant so hardy that it considered a weed in some parts of Australia

Yes it is considered a weed as it thrives along creek lines and wet areas in Western and South Australia. I was once told that it is comparable to Agapanthus orientalis in terms of it being an almost 'unkillable' plant in Victoria. It is a clump forming perennial which has underground rhizomes that it uses as an energy store to re shoot in the cooler months after dying down during the warm season. Propagation is incredibly easy as it is just a matter of dividing the rhizomes with a spade and replanting them.


Close up of the classic white spathe and yellow spadix.


A clump of Zantedeschia with a couple of flowers on display.


Wednesday, September 3, 2014

How to create and maintain a lavender hedge

How to grow & care for a lavender hedge


There are several reasons why people desire to have hedges in their gardens. Privacy, wind breaks, linear definition, ornamental purposes and probably several others that don't immediately come to mind. Lavender ticks most of those boxes though its short stature probably renders it less useful for creating privacy. That being said for what it lacks in stature it more than makes up for in perfume as there aren't many other hedge plants that have such a strong scent. This article goes through the process of planting a lavender hedge from seedlings and how to care for it until it reaches the desired size.

1. What variety of lavender should you choose for your hedge?
That's right there is more than one type of lavender you can use for creating a hedge. The basic two types are English and French however there are now several new types in nurseries with more showy flowers. Most of the new types I have seen tend to be more closely related to French lavender and should be cared for the same way. For more information on the differences between French and English lavender click here to see another blog entry I've written on the subject.

2. Choosing a location for the hedge.
Lavender is not an incredibly fussy plant but It does like sun and I wouldn't grow it in a very shady spot so don't plant it against a south facing wall (or a north facing wall if you are in the northern hemisphere). The other good things about lavender is that it is fairly drought tolerant so irrigation may not be required depending on your local environment. As an example I only really water my lavender at home in the very hottest part of summer and it is growing just fine.

3. Soil preparation.
Even though lavender is not a fussy plant you might as well do some soil improvement before you plant unless your soil is already in fantastic shape. My reasoning behind this is that hedges are usually planted with the view that they will be there for a long time so if you don't improve the soil before planting you wont have the chance to do so in the near future. Lavender being of Mediterranean origin prefers slightly alkaline and free draining soil so mushroom compost is an ideal candidate for soil improvement. Dig some through the area and its sweetness will ensue more alkalinity and because it is compost it will improve soil structure and therefore increase drainage in clay soils (or conversely increase water holding capacity in sandy soils).

4. Spacing the plants.
Spacing is important when planting a hedge. The main point is that you don't want to space the plants too far apart as they may not grow wide enough to mesh together which is what hedging is all about. Planting them too close is not so much of an issue as it just means they will mesh together faster (but will be more expensive as you are using more plants). The plant tags that come with the seedlings you buy will specify the spread and height of the plant when full grown and you can use that information to figure out what spacing is required. Different lavenders have different widths so using the plant tag information is ideal but if you want a precise figure I suppose if you planted lavender with a spacing of about 40cm it would mesh together nicely.


A row of Avonview lavender that I planted for a client. I used 40cm spacing which should provide a fast meshing of the plants.


5. Planting out the seedlings.
Some basic rules I like to follow when planting out seedling are timing and watering in. In terms of timing I mean planting the lavender in early spring which gives it a good chance to put on some healthy early growth. Also as with planting out any small seedling, don't plant it out in extreme weather (either extremely hot or freezing frosty weather). Watering the hole you dig to plant the seedling and then the seedling in situ also ensures a happy seedling.

6. Feeding the seedlings.
Adding some pelletized chicken manure after planting is a good idea to ensure adequate plant nutrition. Once established I would feed the plants every year when the weather starts to warm up and again a couple of months later.

7. Tip pruning the plants.
People have different ideas about when to first prune lavender plants. I like to let the little seedlings establish for some time before I give them their first pruning. I wait until I notice that the plants have put on some growth (say 25% of their starting size) then prune them back by about 10%. The first pruning I tip prune the entire plant to encourage more branches to develop all over the plant. After that I wait until the plants have put on more growth then after that I tip prune the top of the plant which has the effect of making the sides kick out. Keep doing this until the sides mesh together and form a rough hedge. After that I wait for more growth then I prune the hedge to a desired shape.

8. Shaping and maintaining the hedge.
Keeping your hedge trimmed to a desired shape is easily achieved if you keep on top of things but you may get to a stage where the hedge has vastly outgrown its desired form. From there you will need to cut back the hedge back to the desired shape. If you have let the grow too much the hedge may look very woody after this heavy pruning. If you have English lavender do not prune back to the point where you see no leaves and only woody stems as it probably will not grow back. French lavender and most of the new style French variants can be pruned back quite far and still come back. The rule I follow is that I cut back as far as I can so long as I see at least some leaves (often tiny) and no further. So far I haven't killed a lavender hedge by following this principle.


 French lavender hedging I maintain in desperate need of trimming.  You can see the shape is starting to degrade so the next time I prune this hedge I'll cut it back quite hard.


Sunday, August 24, 2014

Crassula ovata aka Money Tree or Jade Tree. One of the easiest pot plants to grow.

Crassula ovata

Without a doubt Crassula ovata is one of the hardiest and neglect tolerant plants I have grown to date. It has a few different common names 'Money Tree' being the most common. The problem with common names is the confusion that arises when different plants are given the same common name and Crassula ovata is one such plant. I have found that people often give all Crassula's the moniker 'Money Tree' especially the smaller leafed Crassula (I'm unsure of the botanical name). The great thing about this plant is that it is almost a 'pot and forget' plant. Being a succulent it requires very little water in the summer and even less in the winter. It is also almost fail proof in terms of its strike rate when propagating it from cuttings which can be either stem or leaf cuttings. It flowers in winter and can be planted outside in the ground or potted up and placed either inside or outside. The only trouble I have had with my potted Crassula is frost damage which occurred when I moved the plant from its original position where it was protected by my verandah. Crassula ovata is originally native to South Africa but is now found many countries. It is often used as a Bonsai plant. Crassula ovata is a great plant to gift somebody who desires a low maintenance plant. 


This Crassula was located in a car park in Brunswick Victoria. This attests to its hardiness as it would have to endure all sorts of damage in that location.


A close up of a tiny white / pink flower cluster.


As with many other succulents the appeal is mostly in the foliage. 


This is what heavy frost will do to a Crassula. This poor fellow is from my home and it had to endure not only heavy frost but also snow this winter. If I had kept it under the cover of the verandah it would have been fine. I'm predicting it will bounce back once the weather warms up.

Saturday, August 16, 2014

How to prune a rose bush


How to prune your rose plants


Winter pruning;

For standard roses the best time to prune (in Melbourne) is late winter when the plant is dormant. I pruned my roses a few weeks prior to writing this blog entry.

Why do you need to prune roses?

  • To remove weak spindly growth and direct energy to stronger braches and therefore give a larger flower size.

  • To remove dead or diseased branches which can harbour pests and disease.

  • To direct the growth of the plant outwards to produce the classic vase like shape of a rose bush and also increase ventilation by eliminating inward crossed over branches

  • To shorten back last seasons growth by two thirds or maybe a little more to encourage regeneration and keep a more compact shape
Making the cut;

So you are ready to make your first cut. You will need a sharp set of secateurs and if you want to get really thorough you can sterilize the blade(s) with some Alcohol or bleach. Sterilizing them can help prevent the spread of diseases. Commonly it is taught that you need to make an angled cut 5mm above an outward facing bud. You want to cut to an outward facing bud to direct growth outwards and create what is known as a vase shape.

 Cutting 5mm above the bud is important as it prevents die back. Die back occurs to all the stem above the last bud which you cut to which is why a close cut matters

The theory behind why an angled cut is necessary is that an angled cut directs water away from the bud. Some people have told me they don't believe in angled cuts as they increase the size of the plants vascular plumbing and therefore encourages water to pool in the vascular entry points. Personally I don't worry too much about the angle and concentrate more on the position of the cut in relation to the bud.

The last point I will make is that if using bypass secateurs you want to cut with the blade facing towards the part of the stem you want to keep and the anvil facing the direction of the part of the stem you are going to discard (see picture below). This is to prevent bruising the stem / bud.

Summer pruning (dead heading);

Which is essentially dead heading old spent flowers from the rose bush. If you do not dead head the flowers then a rose hip will develop from below the spent flower. This has the effect of suppressing further flower bud development. I've always been told that when pruning off the old flowers you should go down to what is known as a five leaf set. People have told me that if you do that you should get new flowers appearing from the bud which develops from the base of the five leaf set. I'm not sure whether the science supports that theory but it was worked for me in the past. As I'm writing this during winter I can't provide any pictures for this procedure but I will write an entry in the Summer which includes pictures to help you understand this method.


Picture of a rose bush during mid - late winter in Melbourne. More specifically it is in the garden of my main workplace (one of many) which is the college called International House (Melbourne University). This is the 'before shot'.


Hopefully you can see important things in the picture below. The first is that I have the blade of the secateurs positioned on the side of the stem I want to keep and the anvil on the side of the stem I will discard. The second thing that I hope you can identify is the little bud which I'm aiming to cut roughly 5mm above.


This is the 'after shot'. It looks bare now but will look fantastic once it has new growth and flowers.


After a few weeks that little bud you pruned above should be putting out new growth like the one in the picture below which is a rose bush in my home garden. This particular but looks a bit rough maybe I should have sharpened my secateurs before pruning.


Sunday, June 29, 2014

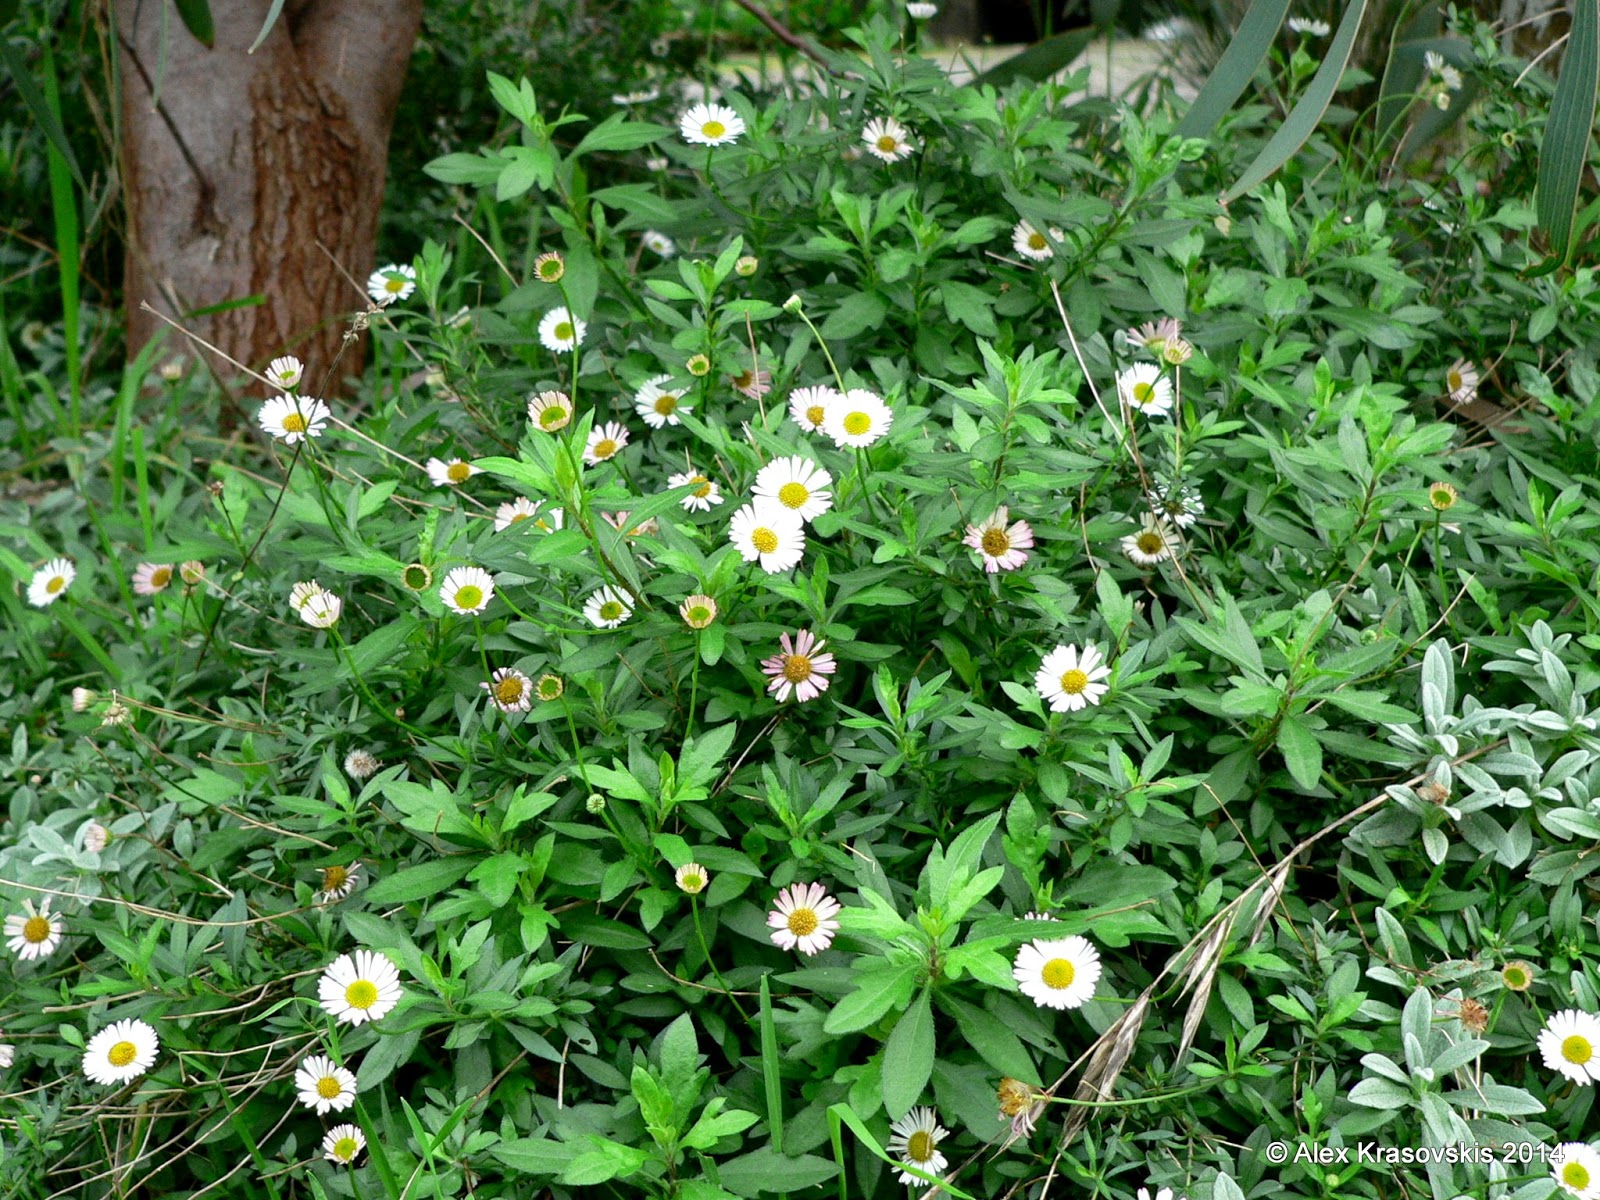
Erigeron Karvinskianus aka Seaside Daisy. A classic ground cover plant.

Erigeron Karvinskianus (Seaside Daisy)

I was recently doing a job overhauling a clients front yard and needed a ground cover plant to fill a space. The plant needed to be able to tolerate some shade, tough, a relatively low water user and a prolific spreader with the ability to out-compete any weeds that might pop up. A mass planting of Erigerons immediately came to mind.

Erigerons have been a staple plant of many cottage gardens in Melbourne for as long as I can remember. They are a plant I had trouble formally identifying. When I asked people what they were called people just shrugged there shoulders and said things like 'I don't know... That daisy plant'. They are unassuming and common but don't let that deter you. Erigerons are a tough little blighter of a plant able to tolerate dryness, shade and general neglect. I have them in my own garden in Macedon where they have proven to be very frost hardy. I have never watered them and they still thrive. Another great thing about seaside daisy plants is how they seem to constantly have at least some their tiny white / pink flowers on show in the cooler months were they are at their low ebb.

Seaside daisy spacing for use as a ground cover

Information on the plant tags for Erigerons usually states a width of about 1 metre. When I planted out my clients garden with them I spaced them at 40cm to ensure a fast meshing of their foliage. I had improved the soil in which they reside so I wanted fast coverage on that area so weeds couldn't take hold. Seaside daisies will self seed and spread around a bit so you could probably get away with planting them a little further apart if  need be. 


The classic daisy flower of Erigeron Karvinskianus


 Here they are having no trouble covering the soil under an established Hakea tree in my garden in Macedon. Keep in mind this picture was taken in winter and they are usually described as being a warm season flowering plant.


Saturday, June 7, 2014

Fuchsia boliviana. A plant for a south wall or shady spot in the garden.

Fuchsia boliviana

Selecting plants for shaded areas in the garden can seem like daunting prospect for the beginner gardener. There are many to select from and finding them is as easy as going to your local nursery and asking for some options. One option if you live in Melbourne or a place with a similar climate is a medium sized bush called Fuchsia boliviana.

Fuchsias are quite versatile plants in the sense that they can tolerate shade and are quite happy either in the ground, potted or in hanging baskets. You can prune your fuchsias to a desired shape in winter. I would not describe them as low water use plants. To thrive they need a good amount of water in the hotter months of the year and will benefit from a feed whilst in their peak growth period. They don't like extremely hot temperatures (close to or above 40 Celsius) but if given shade and lots of water they can survive short periods of extreme heat.

When people think of fuchsias the image that I'm guessing would mostly come to mind is that of the smaller fuchsia shrubs with the intense pink and purple flowers. Fucshia boliviana is a different kettle of fish, it has large drooping red flowers that are of a different shape to their more popular and smaller cousins. You can probably guess from the name that this plant is native to Bolivia, Peru and Argentina and in Melbourne it flowers in late summer and autumn. They can grow to between 2 and 4 metres tall. The one pictured below I have looked after for almost 3 years now. It has survived temperatures of 40 and over. It even made it through a small heat wave where the weather was almost 40 or over 40 for 4 days in a row. It even survived for 2 years with no irrigation other than me giving it the occasional hosing. It did take on a much more vigorous and healthy appearance after I installed drip irrigation to water it. It is located hard up against the corner of south and east facing walls so it virtually gets no direct sunlight. If you live in Melbourne and are willing to give some care to your garden then Fuchsia boliviana is a great plant for a shaded area.


 The plant in its entirety in late autumn.


 Close up of the striking red / pink flowers.


 Hidden from sight in the first picture is this other variant that is growing behind it. Not sure of its name but is the same plant but with white sepals on its flowers.